Software and firmware
In this lab we are going to use the ArduPilot Mission Planner ground control station (GCS) application. It can be used to configure and control fixed-wing, multirotor and rover autonomous vehicles. It has been developed as an open-source application from the ArduPilot team.
Mission planner is only compatible with Windows. If you are using a different operating system, please use Q Ground Control from the PX4 team. The configuration steps will be the same, but the user interface and description of how to complete them will be different to what is presented in this workbook.
Install Mission Planner
Download and install the latest stable release of Mission Planner following the standard installation instructions here: ArduPilot > Mission Planner Installation
Explore the application. Explore each tab and see what they do. Note that some options will not be available without a device connected. Use this resource to work through each tab: ArduPilot > Mission Planner features
In the following sections of this lab we will try to highlight where to look in the Mission Planner application through the use of the following tags:
- Screen which refers the the view options at the top of the window. For example DATA, PLAN, SETUP etc.
- Tab which refers to tabs display on certain screens. For example on the CONFIG screen we have Basic Tuning
- Button which refers to a button to push.
Install ArduCopter firmware
To make use of the autopilot you need to install the appropriate firmware. This will need to happen for the first use and if you need to upgrade the firmware or repurpose the autopilot to a different platform / configuration.
The process of installing the firmware is performed in Mission Planner.
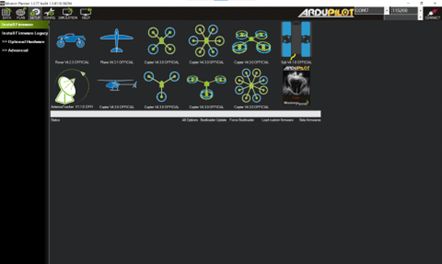
Figure 10: Mission Planner Setup screen showing the Install Firmware page
Install the latest stable release of ArduPilot Copter VX.X.X OFFICIAL via Mission Planner following the instructions presented below.
- Disconnect all cables and components from the CubePilot Cube Orange autopilot
caution
It is good practice to complete the firmware install with all peripheral components disconnected from the autopilot.
- Plug in the micro-USB cable to the Cube Orange and into your laptop (Windows should automatically recognise the device and install the correct driver software).
- Select the COM port of your board and set the Baud rate to 115200 in the drop-down boxes in the top right. Do not hit connect just yet.
- Navigate to the CONFIG screen and select the Install Firmware tab.
- Select the firmware that matched the configuration of your drone (in this lab's case it is the quadcopter image called Copter VX.X.X OFFICIAL).
- Follow the prompts and instructions for the installation process (this may include unplugging the board, pressing OK, and plugging it back in to help Mission Planner to detect which board you are using).
If successful you should be presented with the status "Upload Done" and you should be able to connect to your autpilot (via the Connect button in the top right of the Mission Planner window).
The ArduPilot reference to installing firmware can be found here: ArduPilot > Mission Planner > Loading Firmware
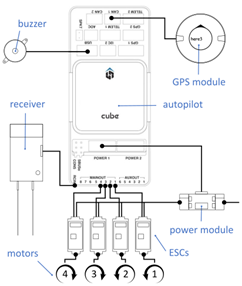
Upon successful firmware installation, disconnect the autopilot from your laptop and reconnect all the cables and components using the diagram below as a guide: